
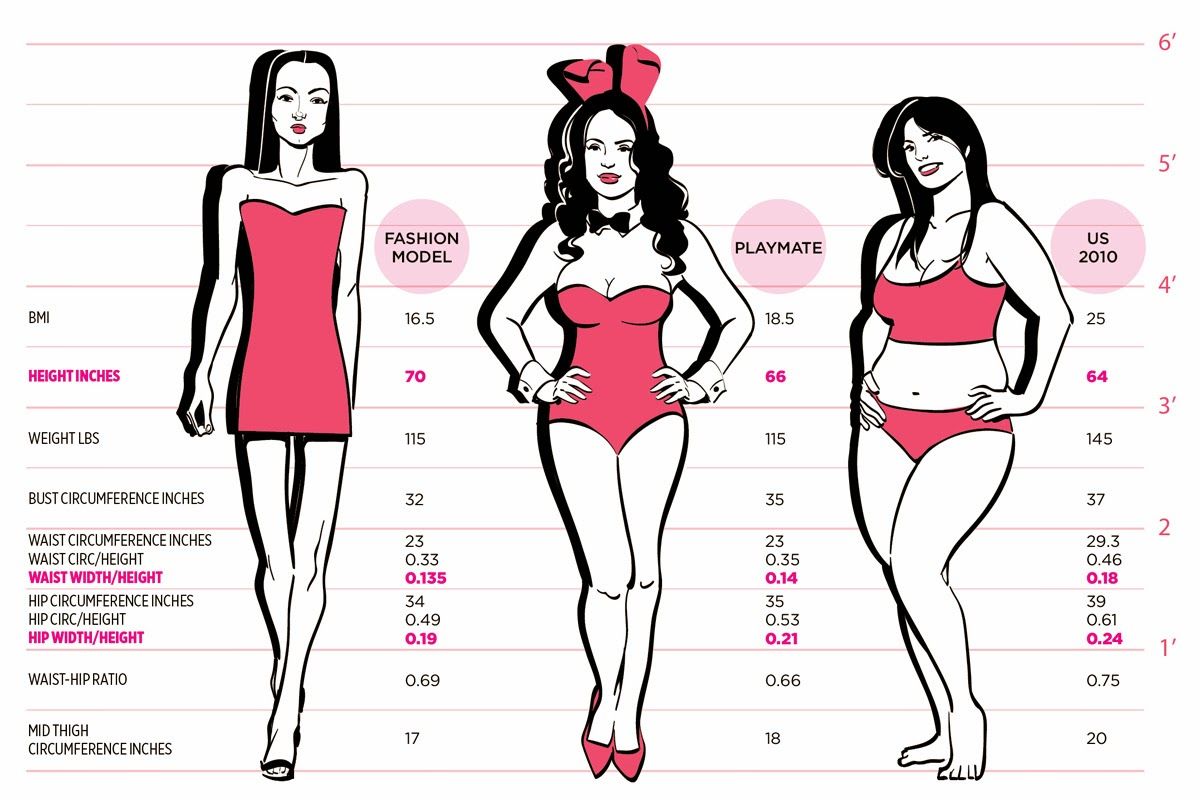
Women always try their best to look perfect. While they try to be perfect with everything in totality the game actually begins with your body. In case you have ideal body measurements for women the battle is almost half achieved. Actually, the body measurements for women are determined on the basis of their height. The calculation of the ideal weight as per your height is known as body mass index (BMI). Further, the figure of a woman is defined as BWH (Bust, Waist, Hips).
Ideal Body Measurements For Women
As the experts say, even if you do not a perfect BWH ratio – in case you dress well & stay fit, you would surely manage to look pretty.
Secrets to getting Ideal Figure and Perfect Measurement:

Balanced Diet
You should take a balanced diet. Ideally one should have 6 short meals in the day and no 2 major meals. Also, have your meals on time and never miss them. Besides, never eat when you are actually not hungry. This is one of the Secrets to Get Ideal Sexy Figure
Exercise
· Do the exercises required to tone those portions of the body where you actually require it. Yoga & meditation serve a lot many beauty & health purposes.
· Body measurement for women might vary, but with a little effort, one can manage to look fit & presentable.
You must avoid the following things while getting desired weight and complete body proportion that are ideal body measurements for women
· Alcohol & smoking are strictly not advisable. They pace up the aging process and add to your weight. They also damage the beauty of your skin.
· Avoid oily foods, rice, unsaturated fat, sodas, sugar & refined flour.
· Do not take proteins after the mid-day. Always have a fiber-rich meal.
· Replace your tea & coffee with green tea. Caffeine has several ill effects on your health.
· Replace all chemical-oriented diet supplements with natural & herbal options. Also, make sure that you do not have these without the consultation of your physician.
Total Body-Shaping Workout takes 20 minutes two or three times a week.To do some of these exercises, you’ll need a set of two-pound dumbbells and a set of five-pound dumbbells–or one set that allows you to gradually increase the amount of weight you’re lifting. A set of single-piece dumbbells generally costs under $10. The kind that allows you to add more weight to increase resistance costs about $15 to $30 per set in most sporting goods stores. Or if you don’t want to make any investment at all, you can fill plastic jugs or bottles with just enough sand or water to make your own two- and five-pound weights. (Remember: Sand will weigh more than water.)
For some of the exercises that are done on the floor, you’ll probably want to use an exercise mat. A folded blanket works just as well. And a few of the exercises call for an exercise band, which is a strip of flexible rubber you can buy in most sporting goods stores. Exercises calling for a bench can be done on a padded exercise bench or a low bench with a cushion. Do each exercise, except those in the warm-up and the cooldown, 8 to 12 times (you can start with 8 repetitions and work your way up to 12).
This is called a set. If you cannot complete 8 repetitions or reps, that means you’re lifting too much weight. If you can do 12 reps without feeling muscle fatigue, you should be lifting more. If you have been doing the routine for several weeks and it feels comfortable, you can begin doing the second set of all of the exercises. Progress from five to ten pounds gradually, as an exercise starts to feel easy. Following the Total Body-Shaping workout, you’ll find exercises that help tone different parts of your body. (These begin on page 450 with the abdominal exercises.) Start with the total workout, then add or substitute some of the other exercises as you progress. Beginning and Ending the Workout Begin each session with the following series of warm-up exercises, which will loosen up the muscles you’re going to use and help you avoid injury.
Each of these warm-ups should be done ten times. Once you’ve completed the warm-up, you’re ready to begin the workout exercises. Reminder: Each exercise should be done 8 times to start, working up to 12 times as you advance. At the end of the workout, after you’ve done enough repetitions of all of the exercises, you should cool down. Shake your arms and legs a little and walk around for five minutes. Then stretch. Stretching elongates your muscles. It keeps them from tightening up and also keeps them flexible, which helps prevent soreness as well as pulling and tearing. Just make sure you do each of the two stretches shown slowly and deliberately, reaching and bending without bouncing. No-Strain Warm-UpTo begins the warm-up, extend your arms out to the sides, slightly below the height of your shoulders as shown in Figure 1.
Press your shoulders and arms forward and back, turning your arms over slightly as you move so that your palms face back when your arms are forward and forward when your arms are back (see Figure 2). Warm-up your lower back by bending at the waist and placing your hands on your thighs.
Your knees should be slightly bent, so they’re not locked straight. Arch your back upward, like a mad cat, as shown in Figure 3. Then, keeping your hands on your thighs, relax your back to a normal position. Stand up straight. With your right hand, reach toward the left, up over your head, and in front of you on the diagonal as in Figure 4. Feel the stretch along the right side of your rib cage. Pull your right arm down and back (a little to the back of your waist) while bending your arm and making a fist with your hand (Figure 5).
Repeat with your left arm. To finish the warm-up, put your hands on your hips and slowly bend from your waist toward your right side. Straighten, then bend toward your left side. Keep your knees slightly bent, and make sure your trunk is erect and you don’t twist it. Place your hands on your hips and shift your pelvis from side to side. Tighten your abdominal and buttocks muscles and tilt your pelvis backward.
Then as you relax those muscles, tilt your pelvis forward. The movement is like a controlled swing. Body-Shaping ExercisesSingle-Arm RowThis exercise tones your shoulder and back muscles.With your left foot on the floor and your left knee slightly bent, position your right knee on a bench so that your knee is directly under your hip. Lean forward, placing your right hand on the bench, with your back flat and parallel to the floor (Figure 6). Grasp a dumbbell in your left hand, with your arm fully extended downward and your palm facing in. Squeezing your shoulder blades together, pull your left arm up, bending your elbow until the point of your elbow is a few inches above your back (Figure 7). (The motion is like pulling the cord on a lawnmower.) Return to the starting position and repeat. After you complete 8 to 12 repetitions, switch sides and repeat.
Push-Up
This helps tone your entire chest, even if you start with a half rather than a full push-up. Kneeling on an exercise mat, lean forward and place your hands shoulder-width apart on the mat.
Your fingers should be pointing inward and your elbows outward (Figure 8). When you’re in the upright position, your arms and back should be straight, and your knees should touch the floor. Lower your chest to the floor, keeping your upper body rigid. Then push up, straightening your arms. When you’ve mastered the half push-up, you can progress to the full push-up. Begin in the raised position but with your knees off the floor, so you’re balanced on your hands and toes and your back is straight (Figure 9). Remember to keep your fingers in and your elbows out. Lower your whole body until your chest lightly touches the floor.
Then raise yourself until your arms are once again straight. Repeat in the same manner as the half push-up. Lateral Shoulder RaiseThis tones your shoulder muscles. Stand with your feet spread apart about as wide as your hips. Hold a two- or three-pound dumbbell in each hand, with your palms, turned toward your thighs. Bend your knees slightly, so they’re not locked. Now bend your elbows slightly. Keeping your trunk erect and your elbows bent, raise your arms out to the sides until your elbows are just slightly higher than your shoulders (Figure 10). Lower the dumbbells to your sides and repeat.Abdominal CrunchThis exercise tones your upper abdominal muscles. Lie on your back on a mat, with your knees bent and your feet flat on the floor. Place your fingertips behind your ears, with your elbows winged out as wide as they’ll go. Tighten your stomach muscles to curl your trunk, lifting your shoulders until they clear the floor (Figure 11). Keep your elbows out, not near your ears, so the lift comes from your abdominal muscles rather than by straining your neck, arms, and back. Hold the crunch for a few seconds at the top of the lift. Then lower your upper body and repeat.
Rotating Crunch
This crunch tones the oblique muscles along the sides of your abdomen. Start in the same position as for the abdominal crunch. Then leading with your right shoulder (not with your right elbow), lift your upper body on a diagonal toward your left knee (Figure 12). Keep your left shoulder on the floor. Hold the crunch for a few seconds, then lower. Complete the repetitions to your left side, then switch sides, leading with your left shoulder to lift your body on a diagonal toward your right knee.
Squat
This exercise tones your thighs and buttocks. Stand with your feet approximately shoulder-width apart and your toes pointed straight ahead or slightly out to the sides. With your feet flat on the floor, lower yourself into the squat position, extending your arms straight ahead as you do so. You’re in the right position when your trunk leans forward (up to 45 degrees), your butt moves back slightly and your thighs and arms are almost parallel to the floor (Figure 13). While squatting, you want to look forward at all times and keep the natural curvature in your spine.
Do not lower yourself so that your knees extend beyond your feet. Keep your heels glued to the floor to avoid stress on your knees. Then begin to raise yourself to a standing position. Cooldown StretchesFigure Four StretchSit on the floor on a mat, with your right leg straight in front of you and your toes pointing up. Bend your left knee to place your left heel against the inside of your right thigh, close to your crotch. Meanwhile, try to keep your left knee as close to the floor as possible. Bending from your hips, not from your waist, slowly reach out with your right hand as though trying to touch your right toes or ankle (Figure 14). Don’t arch your back; just maintain the natural curve of your spine. Hold the position for 30 seconds, return to the start, then reverse leg positions and stretch your left hand toward your left toes for another 30 seconds. Finally, repeat this stretch, starting with your right leg bent and your left leg straight.
Lying Side Stretch
Lie on your back on a mat with your feet together and your arms straight out to the sides.
Keeping your left leg fully extended on the floor, slowly lift your right leg in the air, keeping your right knee slightly bent. Then without bending your left knee, rotate your right hip and stretch your right leg straight across your body. Keep both hands on the floor (Figure 15). Hold this position for 30 seconds, continuing to stretch without bouncing. Return to the start and repeat the stretch a second time. Then do the same exercise again with your left leg, repeating it twice
5
5